I have taught hundreds of children to make sugar eggs. I taught two groups of kindergartners every year for over 15 years. I taught children how to make sugar eggs in Girl Scouts and community groups and for the city programs department. In fact two weeks ago I traveled to Colorado do make them with over ninety children in my grandchildren’s school classes. It was really fun.
Despite having made hundreds of these eggs for friends and family I never had any for myself. So one year I made a very large one for the center of my basket (a flat, flower gathering type basket) and made 24 small eggs to surround it. It was gorgeous and a real conversation piece the whole Easter Season. I enjoyed that basket of eggs so much.
When Easter was over I carefully set the arrangement, basket and all, into my cedar chest for the next year. The cedar chest was stored in our garage.
The next Easter I went to the garage and pulled out the basket. It was perfect. The flowers on the top were in perfect shape and it was as delightful and beautiful as I had remembered. I was so excited to display it again in our home.
Then I picked up one of the small eggs and looked inside. NOTHING! It was completely empty because the bottom had been totally
licked out. Hard to believe isn’t it. I checked every egg, including the very large center egg and everyone was completely empty.
I have since thought how many surreptitious licks and how many weeks it took to empty all those eggs. To this day the culprit has not confessed, despite the fact that all the suspects are between 28 and 39. Every Easter I am reminded of this family story and we laugh about it still.
Isn’t that a perfect Easter story? They were empty!! Mary Madeline went to the tomb and it was empty. Jesus was not there, he had risen. What a glorious message and event which thrills the hearts of Christians all over the world.
This sugar egg project would be perfect for you and your children. It takes very few supplies and even a two year old can do it. Just remember that only adults care about the end result, children adore the process. So let them have a free hand, helping only when necessary, knowing that however they look in the end your children will be thrilled.
Sugar Egg Recipe and Directions
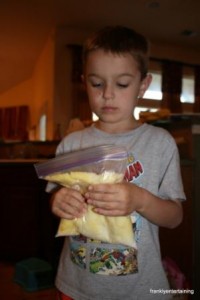
1. Place 2 cups of sugar and 3 tsp. of water in a zip-lock type bag. You can color the easter eggs with food coloring for a tinted shell by adding a few drops of food coloring to the water before you add it to the sugar. Rub the bag between your hands until all the sugar is moist like damp sand. You don’t want any dry particles as they will flake away when the egg is done and you don’t want it too wet, or it takes too long to dry.(For information about using food coloring to color regular eggs take a look at Easter family traditions and tips on coloring easter eggs.) I talked with the children about why there is light inside the egg. We discussed the word translucent. We discussed that the sugar does have spaces between the grains that let in the light. We talked about why you wouldn’t want to completely cover the top of the egg with frosting or decorations. Just know that some children still will!
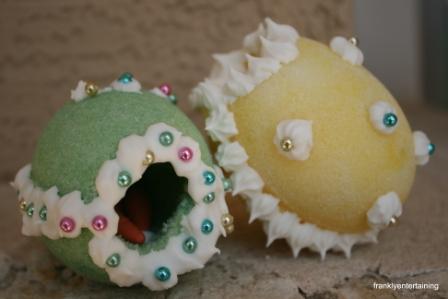
2. Pack the sugar into the two halves of an egg mold and scrape the top off with a butter knife to
make it level. Turn over quickly onto waxed paper. (Children over five can do this part of the process. They will mess up a few times but will eventually get an uncracked shell. If you are working with a group of young children it is better to have the shells premade for them. It lessens yours and their frustration.)
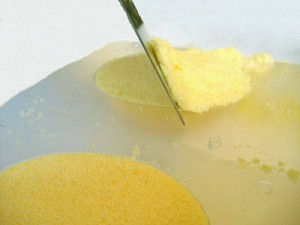
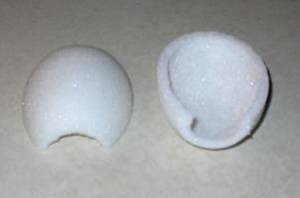
3. Take a piece of thread and make it taught. Slice off the tip of your egg to form an opening. With the point of a paring knife, scoop out just a bit of sugar to create a small cave like look to the opening. This prevents the front opening from hardening too much while the egg dries.
4. If you are making the shells ahead of time you will be able to begin scraping out the sugar content to create a shell after about 1 ½ hours. This will give you a nice thin shell. You want the shell to be about a 1/4 of an inch thick. If children are scooping out the eggs themselves you may want to wait 2-3 hours so they are very firm. This makes a thicker shell which is less translucent but you will have less breakage. (I have to admit that when I work with groups of children I usually have the shells premade as this is a tedious, long part of the process that most children don’t care a fig about; they just want to construct the egg. However, I think it is important for them to know how it was done so I usually start with a demonstration of how I made the shells.) Use a spoon to scrape away the damp sugar on the inside.
5. Let your scooped out shells dry until they are very firm. (Mention that the shells are now concave.)
Make some “royal” frosting in your mixer. This frosting dries like cement. Here’s how to make royal frosting.
It can be made with egg whites or meringue powder. I always opt for meringue powder as the frosting is easier to make and holds up better, especially when working with children. You can purchase meringue powder at most craft stores that have a cake decorating section, baker supply houses and culinary stores. The directions are usually on the package.
1 lb powdered sugar
3 Tb meringue powder
5 Tb. water
It takes about 7-10 minutes of beating time and looks like marshmallow cream. If it is too thin you will need to add a bit more sugar. If too stiff add a couple of drops of water. Make sure the consistency is easy for children to squeeze out of a bag and yet will hold its shape really well.
I always use paste or gel food coloring, rather than liquid food color, as the liquid can thin the frosting. The paste and gel food coloring will also give you truer, deeper colors. A little bit goes a long way! These types of food color can be purchased any where cake decorating supplies are sold and last for many years.
7. I purchase disposable decorating bags for children. I cut off the tip to make a hole. I do not use decorating tips as the frosting dries up making it harder for children to squeeze it out. If you do not have access to these decorating bags you can use a zip lock bag with a small hole snipped into the corner of the bag. I put the frosting into the decorating bag or the zip lock bag, twist it tight and rubber band it. This helps children to keep the frosting in the bag.
8. You can use miniatures purchased at a craft store for the inside of your egg. You can also stick stickers on stiff paper or cardboard and cut them out. It is also fun for children to draw and color their own small pictures which are treated the same way as the stickers.
9. Put a spoonful of green royal frosting into the bottom shell and allow the child to spread it around with their finger. Make it thick so that whatever they put inside the egg will stand upright. The size of the shell will determine the amount of frosting that you need.
10. Use a bead of the royal frosting around the outside edge of the bottom shell. (I always talk to children about the word perimeter here.) Now put the two halves together.
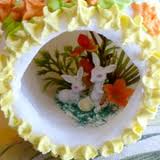
11. At this point I talk with the children about the magic of the egg, that sometimes even adults will ask “How did you get those little bunnies in there”. I tell them we need to cover the seam so no one will know how they did it. I also show them that they should decorate around the front opening. Just remember that some children don’t and won’t want to decorate the front opening or the seam.
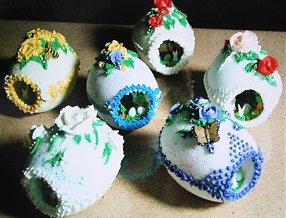
12. You can decorate your egg with frosting flowers purchased in the cake decorating section of the craft store. You can use small silk flowers snipped from their stems. You can use small candy decorations from the baking aisle of the grocery store. Use your imagination. You can even use raisins and nuts. There are many wonderful ways and ideas to decorate Easter eggs.
13. Let your egg creation dry overnight before handling.
Because I have never been a picture taking person, I am indebted to a couple of great websites for the pictures I am sharing with you today.
http://candy.about.com/od/candybasics/ss/sugar_eggs_2.htm
http://www.franklyentertaining.com/2010/04/01/sugar-eggs/
http://www.cakesbyjan.com/panoeggs2.htm
Possibly Related Posts:
- My Christmas Gift to You
- Why take Your Kids Camping?
- Make it Special – Chores and Family Work
- Martin Luther King Day and Black History Month
- Tools to Make 2013 Better – Say NO to New Years Resolutions!!




{ 4 comments… read them below or add one }
I loved these eggs so much when I was little but never guessed they would be so easy to make!
I am extremely impressed with your writing skills and also with the
layout on your blog. Is this a paid theme or did you customize it yourself?
Either way keep up the excellent quality writing, it’s rare to see a great blog like this one these days.
Thank you. It is thesis, which has been customized.
We stumbled over here coming from a different web address and thought I should check things out.
I like what I see so i am just following you. Look forward to
exploring your web page for a second time.